Metal Gear (MSX) Walkthrough
This is a walkthrough of Metal Gear for the MSX2, originally published in 2003 and restored as the game is now widely available as a part of Metal Gear Solid: Master Collection Vol. 1. It has been minimally updated to account for a few changes made to the game with its re-releases. It assumes you are playing in the Original difficulty.
It’s very straight forward and nearly spoiler-free. Remember to use common sense. For example, I’m not going to go all step-by-step on the guards. I’ll warn you if there are any, but how you handle them—shooting them, knocking them out, or ignoring them—is up to you. Ignoring or punching them out is usually the best way. If you trigger an alert, you can turn it off by going into a room, out of a room, or going to another screen. An exception is a Red Alert, triggered by two red exclamation marks in a yellow bubble above cameras, lasers, or a guard’s head. These require you to run for a long time, or to start killing to evade. Some of these you can’t even evade, which I’ll note. Also, you will NOT be able to beat the game if you execute ANY of the hostages. So don’t, or else you’ll get stuck in the end and the game won’t even tell you why.
Skip Ahead
Guards
Shoot Gunner (Shotmaker)
Machine Gun Kid
Hind D
Tank
Bulldozer
Fire Trooper
The Arnolds (Bloody Brad)
Coward Duck (Dirty Duck)
Metal Gear TX-55
Final Boss
Operation Intrude: N313
Your mission is to infiltrate Outer Heaven, find missing FOX-HOUND operative Gray Fox and destroy the Metal Gear that is being built here.
Building One, 1F
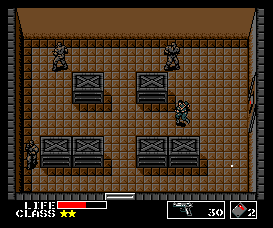
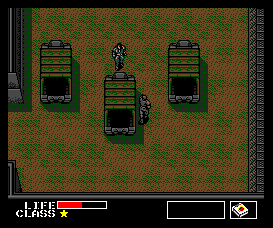
Keep on going north until you reach an area with two guards and a bunch of crates. Head east and you’ll be outside where three trucks are parked. Go inside the western one to get a Ration. Exit and then hide next to the front of the center truck, as a guard will get out of the back and walk around just as shown in the screenshot to the left. Go inside the center truck after he gets out of the truck and grab Card One. Exit and enter the eastern truck for Binoculars.
Exit and then head west, then south one screen, and go east. Keep on going east while avoiding enemies until you reach a dead end and a locked door. Equip Card One and open the door. Inside will be a guard. He’ll fall asleep. Punch him out, grab the Gas Mask on the table, and exit.
Now head all the way west. When you can’t go west anymore, head all the way up north until you reach an elevator guarded by two guards. Go east and you’ll find some more trucks. Enter the western truck to grab a Handgun (but no ammunition, damn it!) The truck next to it has… A FUCKLOAD OF GUARDS! So don’t go in there. There’s a Land Mine in the eastern truck but a guard is inside. So hide behind the crates to the right. When he passes by, quickly run inside the truck, grab the Mines, exit, and head west back to the elevators. Now wait behind the series of tanks until the two guards here go to “RELIEVE” themselves. Enter the elevator and take it to the top floor.
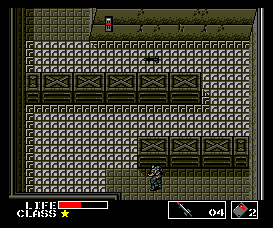
Building One, 3F
This can be quite tricky. Cameras automatically trigger a Red Alert, so watch out.
Go hide behind the small right wall that has a camera attached to its north part by taking the southern route. When the big camera of the western wall passes you, run south to the western route.
While avoiding the guards, go through the western opening. Grab the Handgun ammo, equip Card One, and go south. Rescue the P.O.W. here, open the east door, and now equip the Gas Mask and go in.
This room is filled with gas. Good thing you didn’t have to backtrack to grab that Gas Mask, huh? Follow the path and exit using Card One. Knock out the guard here and, while avoiding the camera, enter the bottom western door using Card One. Rescue the P.O.W. inside and exit. Head east. You’ll get to a dead end and an opening. Enter the opening.
Here, a weird pillar of death is rolling around. Touch it and you die. You can get the Plastic Explosive here if you want to risk it. Either way, head east. After exiting the pillar room, stand still and wait until the guard walks right next to you and punch him out. He’ll never know what hit him!
Continue heading east while being cautious of guards until you reach a screen with two doors, a camera guarding both, and a guard. While avoiding the cameras, take out the guard and enter the southeast door with Card One. Inside will be Card Two. Grab it and exit. Use Card Two on the northern door for a Ration inside. Now head all the way back west, go south in the room with that Pillar of Doom, and go west. Open the top western door with Card Two while keeping watch of cameras. Inside will be some Remote Controlled Missiles. Grab them. Now you’ll have to go east again, back inside the room with that pillar again, and head all the way east to the heavily guarded room… again. Except this time, you’re going to head north.
Here, you’ll notice the floor is glowing. That’s because it’s electrified. See that weird looking thing ahead on the wall? Direct a Remote Controlled Missile to it. This will stop the electric current, allowing you to walk on it safely. Head north. Here, two guards walk around. Enter the only door here with Card One and rescue the P.O.W. inside, and he will give you Diane’s frequency: 120.33. Exit and head north. There are two guards guarding an elevator here. Head west for now.
Watch out, three guards are walking around. Take the two near you out and enter the northern door with Card Two when the guard to the west faces south. Inside is a Cardboard Box. Grab it and exit. There will be two guards outside. Enter the western door using Card Two. Here, enter the center room with Card Two.
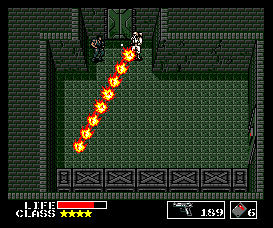
Boss: Guards
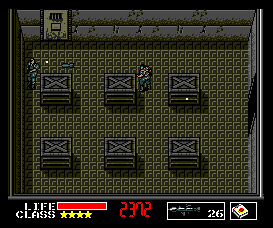
Right as you walk in, four guards will battle you. For some odd reason, you can’t punch them out so just use your Handgun. One bullet kills each one. You actually are not required to kill these guards, you can just head east using Card One, but the Silencer is pretty handy. There’s no real strategy except for “run around and don’t get fucking shot!” Don’t feel bad about using a Ration here. After the last guard is shot, the Silencer appears out of nowhere.
Building One, 3F
Head east using Card One. Inside is a Grenade Launcher. Exit the entire room and go west, then south, and then go into the door on the eastern wall using Card Two. Rescue the P.O.W. Exit and go north, then head back east to the elevator you saw. Just made a mad rush into the elevator—even though the guards here trigger a Red Alert, getting in the elevator evades it. Anyways, take it to the second floor.
Building One, 2F
Using the crates, go south while avoiding the camera. Wait for the guard to fall asleep, and head south again. This place is rigged with lasers. Unfortunately, you don’t have the IR Goggles, so follow this map:
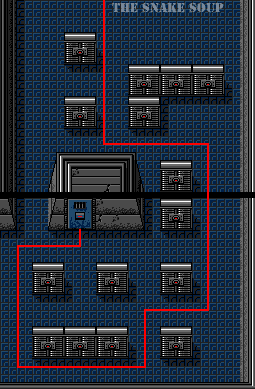
Enter the door with Card One. Rescue the P.O.W. inside and your Class Rank will go up. Rad. Now go back to the area with the elevator (use the map above and just go backwards) and take the elevator to the first floor.
Building One, 1F
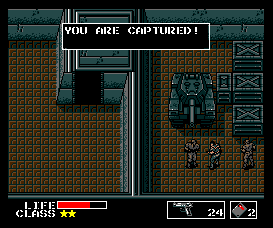
Head south. Be very careful of the cameras here. Now you might be going “Yeah, easy for you to say, but there’s too many fucking cameras!” right about now. You are correct. So why not use that Cardboard Box you got earlier to some use? Open the western door with Card Two and rescue the P.O.W. inside. Exit and go south (with the Cardboard Box, of course). The guards trigger a Red Alert, so use the Cardboard Box to get near the guards and knock them out. Enter the west room with Card Two and grab the Sub-Machine Gun inside. Exit and open the west room with Card One. Rescue the P.O.W. in here and exit. Head south. Head west here. Even though it’s a dead end, continue forward. You will be captured.
Building One, B1, Secret Cell
Looks like you’re the P.O.W. now! Since you aren’t tied up like the others, why not try punching the west wall? Punch different areas until you hear a funny sound. When you hear this sound, keep on punching until the wall breaks. You’re free! Oh wait, you’re in another cell… but with Gray Fox! Rescue him and your first objective is complete. Punch the south wall and use the same method as before to break an opening. Don’t ask why Gray Fox isn’t leaving or coming to help you, just leave him be.
Building One, B1
Unfortunately, your equipment and weapons were taken away. You’ll have to be careful until you get it all back. Head east and you shall meet your first real boss.
Boss: Shoot Gunner
Shoot Gunner. He shoots. With a gun. (Or: Shotmaker. He makes shots. But not the kind you want to drink!)
This guy’s pretty easy. First, dodge his crazy shots that look more like puffs of smoke and go into the door that is located on the bottom right of the screen by breaking it open with a punch. Inside is a bag, which is filled with your weapons and equipment. Check your equipment and look at “Transmitter.” This item alerts the guards of your presence, so get rid of it by pressing the spacebar (or the action button) with it highlighted. Equip Card Two and your Handgun. With all your stuff back, it’s time to take down the ‘Gunner/’Maker. Run up towards him and quickly tap the action button while facing him to fire a bunch of bullets. Ten hits kill him. You’ll probably only get hit once, so if you don’t have enough health, use one Ration.
Building One, B1
Go into the bottom left room with Card Two to find Card Three and some ammo. Exit the room and enter the eastern door with Card Three. There are dogs here. You may love dogs in real life, but you will learn to hate dogs in this game. SHOOT THEM! Now punch the wall that’s in front of the doorway you just came out of. Punch different areas until you hear a weird sound. Unfortunately here, you cannot use your fist if fury to break open an opening. So use a Plastic Explosive to open up a pathway.
Equip your Handgun, head east, and continue down the spiral path. A dog will follow you. If it comes near, shoot that bastard. When you reach a dead end in the spiral, punch the left wall and create a hole using the same methods as before. Now go around the spiral again until you reach a dead end. Go back one screen and punch around the south wall to find the weak spot and blow it up for a hole. Go through it and go around the spiral again and enter the door using Card Three to find a Bomb-Blast Suit. Exit, and go back to the beginning of this spiral passageway. Head one screen north and search the western wall for a weak spot, blow it up with a Plastic Explosive, and enter the passageway to find an Enemy Uniform. Exit and head north, following the spiral until you can find an elevator. Take it to the second floor.
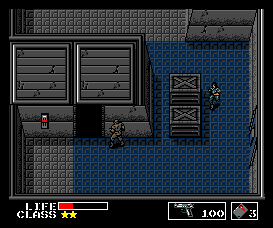
Building One, B2
Go south, knock out the sleeping guard, and take the western route to the north screen. Keep on going this path until you reach an area guarded by three guards. Use your Cardboard Box to sneak westward.
Use the Cardboard Box here as well to not get caught by the camera guarding the two openings here. The north-eastern opening here has ammo and the north-western one has Plastic Explosives. Stock up and head back east. Now try to sneak up to the door. Open the door using Card Three. Run through and open the door ahead with Card Three. Avoid the Death Pillar and go south.
Rush south until you get to a screen with an open door to the west and a closed door to the east. Go through the west door to find three guards having a sleepover. Odd. take them all out and grab the Land Mines here. Exit and then go through the eastern door using Card Three. Save the P.O.W. inside, exit, and head south.
Here, you’ll find an electric floor that has not been activated yet, but a guard near the activation panel. If he sees you, he’ll activate it and you’ll, you know, die. You can manage to take him out or even get to the door near the activation panel anyways and enter it using Card Three to get the IR Goggles. Exit the room, take down the guard again, and then enter the eastern door with Card Four.
Now head all the way back north, turn east in the pillar room and continue heading that direction. Then go south in the screen with the elevator until you reach the area rigged by lasers. Equip your IR Goggles. Pretty. Now go south while avoiding lasers, then west until you get to a screen with a guard guarding an isolated room. Enter the room by using Card Three and inside is a P.O.W. Rescuing him adds a star to your class and he tells you where Dr. Pettrovich Madnar might be. Exit and head west using Card Three.
Boss: Machine Gun Kid
A kid. With a machine gun.
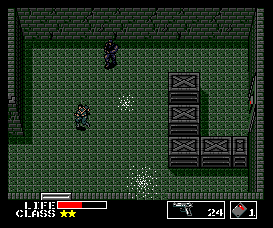
This kid’s a bit tougher than the previous boss. He only moves around in the north part of the screen, so use the walls as defence. Run the other side of where he is, stand to the left or right of him, and fire away. Ten bullets kills him off. Or go full Rambo and run towards him while firing your Sub-Machine Gun.
Building One, 2F
Open the northern door with Card One. Inside is the Parachute. Grab it, exit, then head east. Equip your IR Goggles, if needed, and go back north to the elevator. Take it to the Roof.
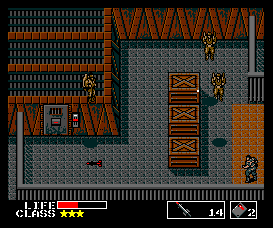
Building One, Roof
Equip the Bomb Blast Suit so you can walk around here, or else the wind will push you away. Don’t be afraid to take this off later when you need to use your other equipment.
Anyways, go south until you reach a screen with a door. Enter that door with Card Three and pick up the Remote Controlled Missiles. Exit and head go all the way north to the elevator entrance, but this time go west until you reach a dead end. From here, go south. Enter the eastern room for some Handgun Ammo. Exit and head south using the eastern route. Go up to the door at the end of this passageway and enter using Card Two. Rescue the P.O.W. inside, exit, and head all the way back north, then east one screen. Go south here.
You will need to cross two shaky bridges. Damn, they’re tricky! Might take some practice. Now when you get passed the bridges, you’ll find some freaky guards. I mean freaky. Rocket guards, man. They can even tell if you’re hiding under a fucking Cardboard Box! They WILL see you no matter how sneaky you are, so just run west and destroy the control unit here with a Remote Controlled Missile. Enter the room using Card Three. Grab the Mine Detector and equip the Handgun because I bet those Rocket guards are rushing to kill you. Kill them and exit. Head all the way east. Like I said, the rocket guards always see you, so screw them and just run until you face the…
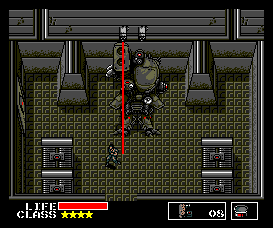
Boss: Hind D
Unlike the NES version’s cheap substitute bosses “Twin Shot,” you take on a legit helicopter here. This is the first of many appearances of the Hind D in the Metal Gear series. Like lots of things in this game though, it doesn’t really battle you. It just stands there firing at you. Just wait until Zanzibar Land, Solid Snake…
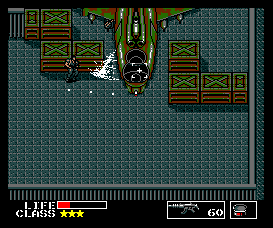
Run quickly to the position in which Snake is in the screenshot shown as the Hind D can’t fire at you here. Equip your Grenade Launcher and fire continuously at the cockpit. Should take around twenty hits to blow it up.
Building One, Roof
Head north, then west. Equip the Parachute and continue west.
Building One, 1F, Courtyard
Great, you’re surrounded by dogs. Shoot them all and head south. Equip your Mine Detector. Enter the eastern truck, as the western truck will drive you back to the entrance of Building One, requiring you to go ALL the way to the Roof and parachute off it again. So just don’t get in the western truck unless you’re an idiot. Grab Card Four out of the eastern truck, exit, and go back north. Ignore the door here (the room is empty) and head west. Open the north-western door and rescue the P.O.W. inside. He will tell you that Dr. Pettrovich Madnar was relocated to Building Two. Great. Exit and go through the other northern door here.
Building One, 1F
Stock up on Land Mines by hiding behind the crates, waiting for the guard from the eastern truck to walk by you, and entering the truck. Exit the truck and then go through the eastern door using Card Four. Then go through the northern door to exit Building One using Card Four.
Desert
Equip your Mine Detector and enter the west truck. Grab the Plastic Explosives and exit. Do not enter the east truck. Now head north while avoiding mines until you reach a truck. Enter it and grab the Ration inside. Exit the truck and continue north while avoiding getting hit by missiles. You can run along the edge of the screen so when you hear the missiles being fired, you can go west or east to another screen and dodge then completely. Eventually you will come across a…
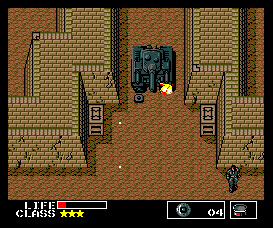
Boss: Tank
It’s a tank. It is what it is.
Equip your Land Mines. Now here’s what you do: hang out at either the left or right side of the building, near the opening the Tank is guarding. When the Tank is backing up, run near it (DO NOT touch it, as it will cause an instant death) and lay three mines in its path (quickly tap the action button) and then get the fuck out of its way! When the Tank runs over the mines, it takes damage. Eleven mines should do the trick.
Desert
Head north until you reach a screen with three guards. Equip the Uniform. You can mess around with the guards here with your Uniform on if you want. They aren’t very cautious. The door will open for you and you can enter.
Building Two, 1F
Your Uniform is useless here. Anyways, head west. Take out the enemy guarding the northwest door and enter the using Card Four. Get the Handgun Ammunition and Land Mines and exit. The guards will see you no matter what, so just rush east. Go into the drainage system and then head back west. Equip your Grenade Launcher. Make sure you have at least eight Grenades before going in. Go up the door and open it with Card Four.
Boss: Bulldozer
Face the horrors of a construction worker driving towards you.
This one is pretty simple if you’re quick. Run a little upwards and fire away, backing up a little after two hits. You can fire two grenades at once. Eight grenades will destroy the bulldozer. If you are too slow, it’ll run over you, killing you. If it gets too close, exit and re-enter the room, though you might not have enough Grenades when you come back in to finish the job. So you might want to memorize the Bulldozer’s movements first, then exit and re-enter before you attempt to take it down.
Building Two, 1F
Open the door in front of you with Card Four. Equip your IR Goggles. You’ll notice that the lasers move around, so dodge them and head for the elevator. Equip Card Two and your Handgun before you enter. You could just rush for the elevator as the Red Alert gets evaded in there. Take it to the roof.
Building Two, Roof
Three guards here will automatically trigger a Red Alert which cannot be evaded unless you go back to the elevator. So shoot at will with your Handgun. You should go to the room on this screen, but the guards are being rather annoying, no? So head east, then go back west. This causes the guards to relocate. Open the door with Card Two, rescue the P.O.W. inside and open the exit. Equip Card Four and run out. Now head east. Great, now there’s four guards! Go south. Even more guards. Go south here as well. Can this get any worse?
Why, yes. Fucking rocket guards here. God damn. Enter that room here with Card Four. Inside will be a rocket guard, Card Five, and Handgun ammunition. Grab it all, and run out killing the rocket guards in your way. Go east and open that door with Card Five. Rush to the elevator here. Yes! FREEDOM! Take it to the basement.
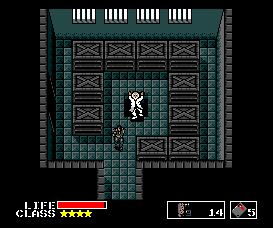
Building Two, B1
Two dogs are sleeping here. Kill them and open the door south using Card Five. Open the north-western door with Card Five and save the P.O.W. here. Open the western door with Card Five. Equip your Gas Mask and then enter. Head north, then east. You will be at a dead end. Punch the eastern wall and you’ll hear that strange sound. Blow this area up with Plastic Explosives and walk through the pathway you just made to go north. Use Card One to enter the door here. Inside is a P.O.W. rescue him and you get a four star ranking! Hooray! Open the exit door with Card One, equip your Gas Mask and exit. Now head west. Open the door here with Card Five.
Look! It’s Dr. Pettrovich Madnar! Wait, it’s actually not. Don’t go near him. He’s an impostor, and the floor collapses and instantly kills you if you don’t run away quick enough. So just go through the western opening. In here is Card Six. Add it to your collection of cards and open the southern door using Card Six. Equip your Gas Mask and get out. Open the western door with Card Six.
Boss: Fire Trooper
“The Fire Trooper” appears hard but is, in fact, really fucking easy. Creep along the north wall. Wait for Fire Trooper to stop torching, and run next to him and fire fifteen Handgun bullets to get rid of him. Toasty. You might get hit once by his flames but a Ration will cool you down.
Building Two, B1
Enter the elevator Fire Trooper was guarding and take it to the first floor.
Building Two, 1F
Equip your IR Goggles and head east without tripping any lasers. Head south here. Now swim across the drainage WITHOUT touching the dark water. It takes away your health (scientifically speaking it’s draining your oxygen, but this IS an 8-bit game from the 80s so cut it some slack) so go to the other side safely, take out the guards, and enter the western door with Card Two. Take out the guard in here and grab the Antenna. Exit and head east while hugging the southern wall. The guards on the eastern screen will see you if you don’t. Now head north. Open the door here with Card Five. The P.O.W. here will tell you how to get to Building Three. Exit, go back south then west. Go across the water again, head north, then west, and go to the elevator. Take it to the second floor.
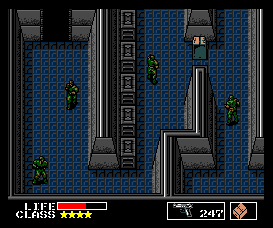
Building Two, 2F
Four guards will see you and immediately attack. You can take them all down or just go south using the eastern route. Then head east. Look! It’s the Arnolds! (Or: Bloody Brad!) But you can’t kill them yet. Just run across the room and go through the eastern door with Card Five. Knock out the guard and open the north-western door with Card Three. Rescue the P.O.W. inside who will tell you Jennifer’s frequency, 120.48. Exit, kill the guard in front of you, and use your Transceiver to call Jennifer. If you did not rescue all the P.O.W.s I’ve been telling you to rescue, killed one, or just fucked up in general and DON’T have a four star rank, she will not respond. Otherwise, she will respond and will put a Rocket Launcher in the next room.
Enter the north-eastern room using Card Six. You should see a Rocket Launcher on the desk. If not, and you’re sure she said she would, go back out and call her again except this time don’t skip text. You have to allow the entire message to get to you without you skipping any of it, for some odd reason. Anyways, it’ll be here. Grab it and exit, go back west to the Arnolds. You’re still not able to fight them at this time. Equip Card One and run to the northwest door. You can make it just before the Arnold hits you.
You will trigger an Red Alert. Run east, open the door with Card Six, kill the guards inside, and grab the Antidote. Exit, head west while hugging the southern wall to prevent another Red Alert, and then go south using Card One to get back to the room with the Arnolds. Nope, still not ready to fight them yet. Equip Card One and rush to the south-western door and go inside.
Knock out the guard in front of you and head west. Four guards are patrolling the area. There is an opening on the west side of the room. I used a cardboard box to get myself there. You can do that or try any other methods. Anyways, go into the opening. Two guards give you a warm welcome in here. Kill them, and take the Handgun ammunition and rockets for your Rocket Launcher. Exit and head north using the Cardboard Box or whatever works for you. Head north using the western passage.
Great, a hallway guarded by guards. This is actually easy, as they slowly rotate their directions. Slowly pace yourself north. Open the door with Card Six. This is the real deal here. Rescue Dr. Pettrovich Madnar who says he won’t tell you anything about Metal Gear TX-55 unless you save his daughter. What an asshole. Prioritizing his daughter over nuclear annihilation? I wish you could beat the shit outta him. You can’t though, so exit and head south while avoiding triggering an Alert until you reach the screen with four green guards. Go east here.
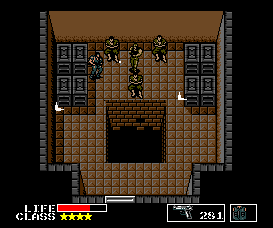
Boss: The Arnolds
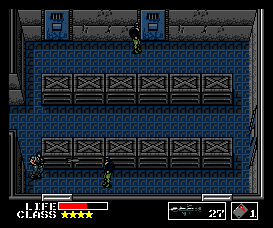
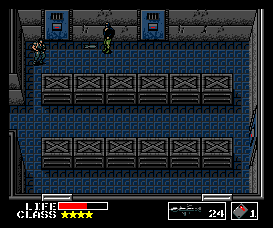
Arnold from The Sixth Day is ready to kill Solid Snake! (Or: What the bloody hell is Brad doing and who’s that bloke who looks like him?)
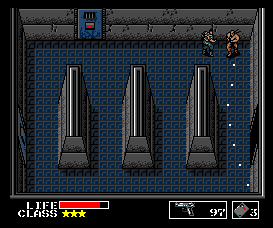
Immediately run to the center of the room and equip that Rocket Launcher. Here’s the strategy: take advantage of the game’s twisted physics that the enemy AI takes advantage of. If you line yourself up to where Snake is in both of these screens above and fire away at the Arnold near you, you are able to attack that Arnold but it cannot attack you, no matter how hard it tries. Four rockets per Arnold, and the last one leaves behind Card Seven as a present for outsmarting the game.
Building Two, 2F
Grab Card Seven and open the northeast door with Card Two. Head east while hugging the southern wall so the guards in the next screen won’t see you. Now call Jennifer at 120.48 again. She will leave open that northern door. Remember to not skip any text again. Walk into the opened doorway and grab the Compass. in the room that was being guarded by two guards. Walk in using Card One, and grab the Compass. Exit the room, and head back west while hugging the northern wall then south to the room where you fight the Arnolds using Card Two. Now open the southeast door with Card Five. Get to the room with the opening and save the P.O.W. inside who will tell you that you need a Compass to cross the Desert. Thanks pal, I already HAVE ONE. Anyways exit and head east. Wait for the guard here to fall asleep and knock him out. Use Card Five to enter the door here. Get passed the Death Pillar and enter the elevator. Take it to the first floor.
Building Two, 1F
Two guards will fight you. You can kill them our just go south using Card Five. Here, DO NOT go in-between the crates, as there’s a pit of death. Go through the western door using Card Five. Then go west and open the door here with Card Six. Inside is the Flashlight. Grab it, exit, and head back east. Go north, across the water without touching the dark parts, and continue north. Go east, then south (going south evades any alert so ignore the lasers) and open the southern door here with Card Four. Rush to the east, then equip your Uniform, and exit the building using the southern entrance.
Desert
Head south for about four screens. Stock up on Rations in the truck here. Equip your Mine Detector and continue south without stepping on any Land Mines. Enter Building One with Card Four.
Building One, 1F
Head east, enter the elevator, and take it to the Basement.
Building One, B1
Head west, then south twice. Open the southern door with Card Four to get the Body Armor inside. Exit, then go west twice and open the northern door with Card Six. FINALLY the backtracking is over!
Now enter the door here using Card Six. The room appears empty, but someone will cry for help. There is a trap in this room, so hug the southern wall all the way to the eastern wall. Punch different areas of the eastern wall to find its weak spot and blow it up with a Plastic Explosive. Walk in and save Ellen. Then go west and exit the room. Go north. Four dogs here, unfortunately. Go through the northern door with Card One.
Underground Tunnel
Damn, it’s dark here! Equip your Flashlight. This place is FILLED with traps. So follow the following map to get across:
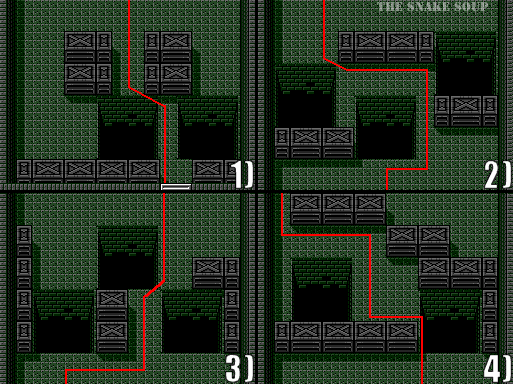
After the fourth screen is a screen with no traps. Open the northern door with Card Six. Enter the opening for some ammunition and exit. Now you have to blow up a passageway on the eastern wall. But doesn’t the position of those crates look suspicious? Inside that empty space lies a pit of death! Here’s what you do. Hug the northern wall and creep to the eastern wall. Slowly creep south while hugging the eastern wall. The pit will open, but you’ll be safely on the edge. Punch around the eastern wall and find its weak spot and blow it up with a Plastic Explosive. Equip your Gas Mask and enter.
Building Two, B1
Head north using the western passage. Then west. If you need rations, enter that room using Card Five, just remember to exit with the Gas Mask on. Anyways, head east using the northern passage. Then north. Enter the opening here. If you didn’t get near the impostor Dr. Pettrovich Madnar earlier, he’s still here. What a sap! Anyways, head west, then south to exit. Then open the western door with Card Six. Enter the elevator and take it to the second floor.
Building Two, 2F
The guards will automatically see you and attack. Rush southward using the eastern passageway. Then go south. Go through the south-western door with Card One. Take out the guard and head west. Go north using the western passageway. You might want to use your Cardboard Box to sneak there. On this screen, once again, head north. The Cardboard Box helps here as well. Enter the room with Card Six.
Rescue Dr. Pettrovich Madnar… again. This time he’ll give you the lowdown on how to destroy Metal Gear TX-55 and then tell you to kill “Mr. Arnold” or “Bloody Brad” (even though you already did, and there’s two of them) Don’t worry about the instruction to destroy Metal Gear, I’ll give that to you when you need it. For now, exit, go south twice, then east, and finally north using Card One. Go through the south-eastern door with Card Five. Then go east and wait for the guard to fall asleep. When he does, knock him out, enter the opening, run across to the elevator without touching the rolling pin of death, and take it to the first floor.
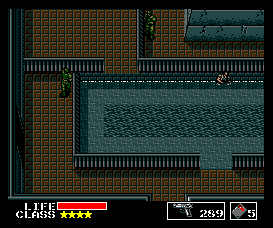
Building Two, 1F
Get across while avoiding enemy fire. Go through the eastern opening WITHOUT going in-between the crates—remember, there’s a pit there. Head north. Enter the water and head east using the northern water passage without touching the dark water. Head east this way, then north. Here you’ll find the northern part is filled with dark water. So get out of the water through the opening on the western side. Go west and open the door with Card Seven.
Desert
Equip your Compass. Don’t let any of the Scorpions touch you. If they do, quickly use the Antidote. Now head north. I recommend staying on the edge of the screen so you can dodge scorpions simply by tuning quick to the west or east to enter a new screen. Anyways, head north. The third screen shouldn’t have any scorpions and the fourth will be the entrance to Building Three. Unfortunately, there’s a fuckload of trucks outside with guards coming out of them to attack you. Do not listen to what Big Boss tries to tell you. Don’t enter any of the trucks, though if you need Handgun ammo you can enter the center-west truck. Anyways, enter Building Three with Card Seven.
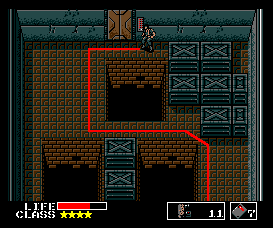
Building Three, 1F
More guards after you. Big Boss tells you to enter the room to your left. Don’t listen to him. Instead, while avoiding the spray of bullets, place a Plastic Explosive on the east side of the northern wall. I recommend punching it first before you set it just to make sure you put it on the right spot, but these damn guards might not give you enough time. Head north through this new passageway. This place is rigged by pits. Use the map shown here to get to the elevator safely. Take the elevator to the 100th level basement.
Building Three, B100
Good news: the cameras here won’t alert the guards. Bad news: they will shoot deadly lasers at you. So be careful. There’s a sort of wall to the south. Behind it is the southern wall. Punch around it and find the weak spot determined by noise, as usual. Blow it up with a Plastic Explosive. Inside are Oxygen Tanks. Exit and head back to the elevator and go back to the first floor.
Building Three, 1F
Use the map above for this screen, except go backwards. Head south. The guards will be alert again, as usual. Exit the building using Card Seven.
Desert.
Use the map for this screen, except go backwards. Head south. The guards will be alert again, as usual. Exit the building using Card Seven.
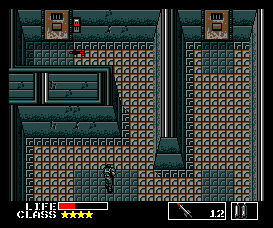
Building Two, 1F
Head east. Equip the Oxygen Tanks (Or “BOMBE,” or “Oxygen Cylinder”) and enter the water. The Oxygen Tanks let you swim in dark water. Head all the way north around five screens until the drainage passage ends. This screen has guards, so be careful. You have to go north, but the problem is that the next screen’s floor is electrified in some parts. Use the screen shown here to determine which areas are not electrified and use it to determine what way you should go north by.
Once here, use a Remote Controlled Missile to blow up the Control Unit which is to the left of the north-western door. Go through the north-western door with Card One… unless you don’t have enough Remote Controlled missiles to blow up the same Control Unit again. When you exit the room, the Control Unit will be there again. So if that’s the case, open the north-eastern door with Card Seven. If you still have Remote Controlled Missiles left, no worries. Go inside the north-western room and grab the ammunition. Exit, blow up the Control Unit again, and go through the north-eastern door with Card Seven.
Boss: Coward Duck
This dirty coward is definitely the most annoying boss in the game. Duck uses three P.O.W.s as shields while he throws boomerangs at you. You can’t beat the game if you kill any of these P.O.W.s so you can get screwed very easily here if you don’t follow my directions. Oh and, the center of the room is set with a pit of death. So follow my directions or die.
Jennifer will call you and tell you that one of those P.O.W.s happens to be her brother and that Duck has Card Eight. Oh, and that she’ll never talk to you if her brother dies. As if you’d kill him on purpose! Immediately run to the left until you bump into the wall and run straight north until you are to the left of Duck. Judge your aim carefully. You might accidentally shoot the left P.O.W.! Use the screenshot here as a guide of where you should be when shooting. Shoot him ten times with a Handgun so that the bastard dies, and the P.O.W.s live.
Building Two, 1F
Grab Card Eight. Now you can rescue all of the P.O.W.s. The center one is Jennifer’s brother. He will tell you that you should climb the left ladder when you want to escape Outer Heaven. Good to know, I guess.
Now exit the room. Once again, blow up that damn Control Unit that keeps on reincarnating. You need to stock up on Rations and Plastic Explosives. Go south. Equip your Oxygen Tanks and enter through the dark water. Keep on going south until you reach an area with an opening to the west. Get out of the water through this opening and head south, then west, then north. Open this door with Card Six.
Inside are Plastic Explosives. Get as many as you can carry. You can re-enter the room to get as much as you can hold. In the MSX version, pressing F1, F4, ESC, then F1 also regenerates items (you can also just press F1 INTRUDER to unlock the ability to hold 999 ammunition and items… cheater).
Exit, go south, then east, then north. If you feel you have enough Rations and ammunition, skip this entire thing and go west and go through the door to exit Building Two and enter the desert. Otherwise, let’s get some Rations! We have to take a pilgrimage to a truck in the Desert between Building One and Two. Go through the water with the Oxygen Tanks equipped and go south, then west. Exit the water through the north passageway and go north. Then west. Then go south twice and east once. Equip your Uniform and exit the building. Head south until you find a truck. Stock up on Rations in here. Then go back to where we were. Go west, and exit Building Two with Card Seven.
Desert
Equip the Compass, head north while avoiding the Scorpions (and use the Antidote if attacked by one) until you reach the entrance of Building Three. Enter Building Three with Card Seven.
Building Three, 1F
The enemies immediately spot you. Take care of them and head north. Be careful of the pits here. Refer to the map I made earlier. Get to the elevator and go down to the basement. Long ride, as usual.
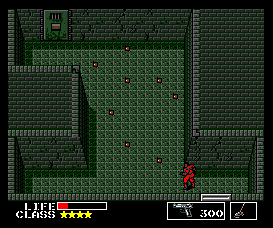
Building Three, B100
Remember, these cameras shoot lasers. Open the east door with Card Eight. Rescue the P.O.W. who will tell you the true identity of the Outer Heaven leader. Interesting, no? Now exit the room and head west. You’ll get a call from the leader himself! Of course, ignore his demands to shut off your game console. Now get to the north door using Card Eight. Sadly, the cameras here are too close for you to dodge their lasers, so you’ll get hit and the Body Armor doesn’t help. Open the door, take a Ration, equip your Gas Mask, and enter.
Do NOT enter the northern door! Instead, punch the north-western wall and try to find its weak point by its sound and blow it up with a Plastic Explosive. Go through the opening. Walk forward until the pit begins to open and head back a little, but don’t exit the screen. Now get to the northern door by walking around the pit’s edge or hugging the western wall. Open the door with Card One, equip your Gas Mask, and then walk in. This place is filled with Mines. You can quickly use your Mine Detector and get to the door, or just use my screenshot here as a guide. Go through the north door with Card One. The floor is electrified but… there’s no switch. So you have to fucking run! Before you do, see if your health bar if full. If not, use a Ration. Now – RUN!
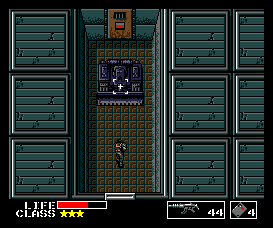
Boss: Metal Gear TX-55
Here it is. The title character himself. In the NES version, you have to destroy a “Super Computer.” All it does is stand there while you place Plastic Explosives on it until it explodes. It won’t be that easy and anti-climatic for you here, though at least it’s not going to be walking around.
Quickly seek sanctuary on the right side of the room. Take a Ration and equip your Plastic Explosives. Here’s how to take this beast down: place Plastic Explosives on each of TX-55’s feet in a correct order. There is a certain order Dr. Pettrovich Madnar gave you, which was Right, Right, Left, Right, Left, Left, Right, Left, Left, Right, Right, Left, Right, Left, Right, and… he forgot the last one. Well the last one was “Right.” Trust me.
So remember: R, R, L, R, L, L, R, L, L, R, R, L, R, L, R, R! The cameras that shoot the lasers are somewhat of a distance away, so you CAN dodge their lasers if you stay close to the south. You might have to use a Ration if you get hit. Take your time when placing the explosives and after placing one, I recommend running to the left or right corner of the room until the explosive you just placed explodes, after which you may place another one.
Building Three, B100
Metal Gear, along with the two laser cameras, blow up. A self-destruct sequence has begun, and the western door opens. In the MSX version you can equip your Cigarettes to buy some time, though this will drain your health in other versions. Equip your Rocket Launcher and go through the doorway.
Final Boss: Big Boss
The commander of FOXHOUND, who assigned this mission to you and has been giving you “support,” was the leader of Outer Heaven all along! He won’t let you leave, so kill the bastard!
DAMN he’s fucking fast! Now stay near any of the crates. I recommend the one in the screenshot here. He will go behind a nearby crate and fire at you from there. Use your crate as a shield, and pop out once in a while and shoot a rocket at him. You’re bound to hit him once in a while, and only four or five direct hits are actually needed to take him down. Not that four direct hits with a rocket would KILL him… *wink wink* *nudge nudge*
Building Three, B100
Now equip your cigarettes if you haven’t already. It’s time to ditch this joint! Go through the doorway. Jennifer’s brother told you to take the left ladder up. So take it up. Your cigarettes should add 1,000 seconds to the timer. So let’s hope you get out safely, which would mean that Operation N313 is a success! Way to go!
