Metal Gear 2: Solid Snake Walkthrough

This is a walkthrough of Metal Gear 2: Solid Snake, originally published in 2003 and restored as the game is now widely available as a part of Metal Gear Solid: Master Collection Vol. 1. It has been minimally updated to account for a few changes made to the game with its re-releases. It assumes you are playing in the Original difficulty.
It’s very straight forward and nearly spoiler-free. Remember to use common sense. For example, I’m not going to go step-by-step on how to deal with the guards. I’ll warn you if there are any, but how you deal with them is up to you. Ignoring or punching them out is usually the best way. If you trigger an alert, you can wait for the countdown to end without being seen again. There are some parts where an Alert cannot be stopped until you finish something. I’ll tell you where these are. Also, unlike the first Metal Gear, the guards here can walk from screen to screen. So keep an eye on your radar. Also unlike the previous game, the guards can move their heads and change their direction of sight, so make sure you watch out for that.
Lastly, I recommend for those of you who do not speak Japanese to get the unofficial English translation ROM patch for MSX, or play an official localized port. The story in this game is incredible for an 8-bit game, let alone one released in 1990. Be sure to let the story introduction play at first by leaving the title screen idle. And reach out to your Transceiver team once in a while, including Campbell, Miller (140.38), Norden/Jacobsen (140.40), and Kesler/Kasler (140.93).
Black Color (Black Ninja)
Running Man
Hind D
Red Blaster
Ultra Box (Four Horsemen)
Predator (Jungle Evil)
Night Sight (Night Fright)
Metal Gear D
Gray Fox
Big Boss
Operation Intrude: F014
Your mission is to infiltrate Zanzibar Land, rescue the kidnapped Czech scientist Dr. Kio Marv and the OILIX formula he was carrying intact.
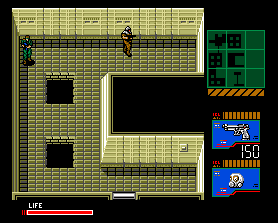
Outside Zanzibar Building
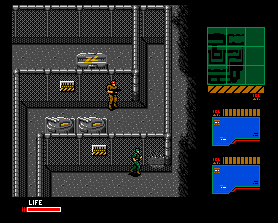
Go north. You will see a few guards here. One of them might even be right in front of you with his back turned, so punch him out using the punch button (“M” or “N” key on the MSX). Go east and get inside the back of that truck for a B1 Ration. Get out of the truck and head north. There should be a part of the fence that’s torn apart you can crawl through. So crawl through by pressing the crouch button (“M” key + Spacebar on the MSX) and moving around. Once you’re on the other side, follow the pathway south, then west twice, then north. If a guard is in your way, hide and wait. Or knock near the end of a screen to make some noise and go to the next screen and wait for him to check and leave the spot on your radar. You can follow him and punch him out.
Anyways, there should be a hole in another fence you can crawl through. Go through it. Use the generators to hide if a guard is walking nearby. Head east. Here should be yet another fence with a hole in it. If there’s a guard there, he’s going to be an asshole and stay there staring at that fence. So distract him by knocking on the far northwest side of the fence. He’ll walk there to investigate so you can crawl through without getting caught. Then go north.
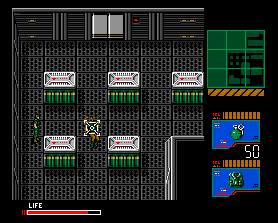
Head east and enter the truck for the Handgun. You can equip it if you want using the weapon menu button (“F2” key on the MSX). Exit the truck and note the hole with yellow stripes around it at the northside of the screen. This is a vent Snake can crawl through. If a guard is headed your way, you can crawl under the truck to get to the other side. Crawl through that vent. In the vents, the path to your left will take you to Handgun ammunition, while going straight forward will take you inside the Zanzibar Building.
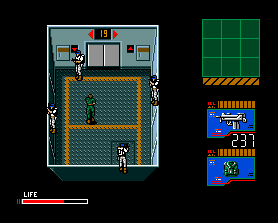
Zanzibar Building, 1F
Walk along the pathway and down the stairway. You will get a call from Holy White (Officially translated as “Horry White?” Weird.) which you should answer using the call button (“F4” key on MSX). After the call, head west twice, then north. Go up the stairway and head east, then north, then west. Here you will find two elevators, with the west one out of service. Punch the call button for the east one and it will come down for you. Get inside it. If you are playing the original MSX version, punch the up button to get to the second floor, get out, and skip to Zanzibar Building, 2F below. Otherwise, punch the down button to get to the basement.
Zanzibar Building, B1
Head north. There is a guard here. If you want some ammo, the door in the north east part of the room that can be opened with the Red Card. Inside the open doorway are the Infared Goggles, which can be used instead of Cigarettes to see lasers without draining your life. Grab them, exit, and head south back to the elevator room. Call the elevator and get in. Punch the up button until you’re on the second floor and get out.
Zanzibar Building, 2F
Be careful here. The floor is noisy. Very noisy. If you don’t want to get any unwanted attention, you might have to crawl around in some parts. Head east and go inside the room to get ID Card 1 and equip it in the item selection menu (“F3” key on MSX). Exit the room and head north. There will be a door to the east. Enter it with ID Card 1 and you will find Binoculars there. Exit the room and pick up the B2 Ration. There is Handgun Ammunition in the southwestern corner of this entire room if you want them. Now take the elevator to the third floor.
Zanzibar Building, 3F
Open the northern door with ID Card 1. Head two screens north, then a screen east with ID Card 1. Avoid the sensor on the floor and head south. Equip your Cigarettes and avoid the lasers (which can’t be crawl under) to head south again. Get to the door on the eastern side of the room and open the door with ID Card 1.
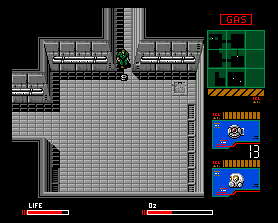
Inside the room, equip your Cigarettes once again and grab the Gas Mask in the middle of the room without tripping a laser. Since the laser in front of the entrance is always on, you have to go around it. Once you snag the Gas Mask, exit the room with ID Card 1. Equip your Cigarettes and go north twice without tripping any lasers and then head west with ID Card 1 while avoiding the sensor. Go south twice and after you open the southern door with ID Card 1, you’re back in the room with the elevator.
Go through the southern door with ID Card 1. You can crawl under these desks, just in case you need to. Head south and go through the top eastern door with ID Card 1. This place is filled with gas, so equip your Gas Mask. Continue east, then north. Be careful of that damn camera (make sure it’s on the other side of the room) and enter the western door with ID Card 1. Hooray, it’s Dr. Kio Marv! Walk up to him…
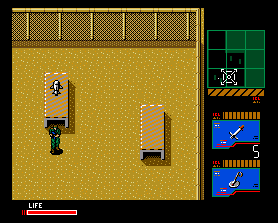
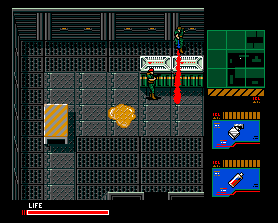
Boss: Black Color
…oh wait. That’s not Dr. Kio Marv. That’s a ninja.
Here’s the thing about this guy. He likes being far away from you and throw ninja stars. Meaning if you go into the box thing, he’ll teleport to the perimeter, and vice-versa. I recommend being outside of the box because it’s a fuckload harder dodging those damn ninja stars inside of it. He has a crazy way of pulling three stars from his ass quickly, so judge your timing right—you’ve got to shoot him either right before he shoots you, or shoot where you think he’ll walk to right as he throws his last star (and you somehow dodged the first two). This is what I call a lucky shot.
Since you’re reading this walkthrough, I’m guessing you aren’t lucky with this game. So just run around the box and stop when he does, quickly face the bastard, and fire. Also, if you reach the east side of the room, he think you’re going to go in the box and transport out of the box. However, if he’s throwing stars, he will continue firing stars until he throws the third one. You might be able to get a shot at him here. But I prefer the “run like a bitch in the outside perimeter to have more room to dodge ninja stars and once in a while fire at the guy” technique.
Zanzibar Building, 3F
After Black Color sort of explodes, he drops ID Card 2. Take it. Since the northern door gets you to a place rigged with lasers you can’t avoid, go through the eastern door with ID Card 1, equip the Gas Mask and head south, then west, then west with ID Card 1 again. Using ID Card 1, go north four times, then east. Avoid the sensor on the floor and go east, making sure the camera isn’t facing you. Equip your Cigarettes and enter the eastern door with ID Card 2 without tripping a laser or getting caught by the camera. Inside is the Mine Detector. Take it and exit with ID Card 2. The camera will spot you, so rush with ID Card 1 equipped all the way west, then south until you reach the elevator room again. Take it to the second floor.
Zanzibar Building, 2F
Head south, then west for more ammunition. Then go north and open the western door with ID Card 2. Inside is a Silencer. Take it so your Handgun won’t trigger an alert when fired. Exit and head back to the elevator, and take the east elevator to the first floor.
Zanzibar Building, 1F
Head east, then south, then west until you reach the end of the balcony thing you’re on and get down the stairs. Then head north for a while. You’ll see some stars leading to a door. Climb it, then enter the door with ID Card 2. You should see a man with a green beret walking away to someplace. Follow him west, then north to the jungle.
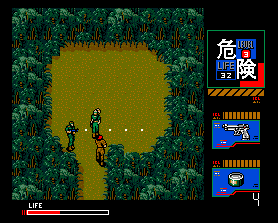
Jungle
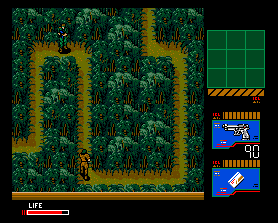
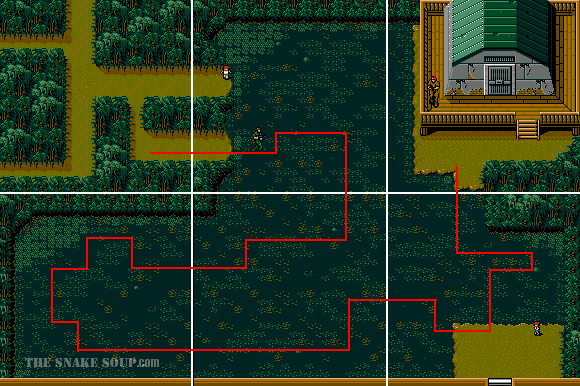
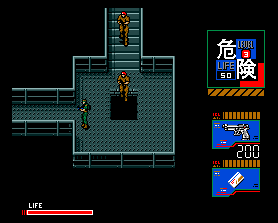
Here’s what you gotta do: follow him but make sure you DO NOT get seen. He won’t trigger an alert, but he will run away and you’ll have to start this part all over again because this guard has the ability to shape jungle terrain different. As the screenshot shows, the guard often turns around to make sure he isn’t followed. So make sure you cannot be seen when he does. He will walk around in loops and shit until you finally reach the cell.
Take your revenge on the green beret guard (or not) and go inside the cell with ID Card 2. You will hear some thumping noises. These are Tap Codes and the game’s instruction manual has an explanation regarding how to use them if you really want to solve this on your own, but we’ll help explain in case you lost yours or something.
One knock means down a column and two knocks mean going right a row. And taps are the number of times move down or right of a column or row. If you figure it out, great.
If not, here’s the solution:
The code is “14082.” Which means Transceiver frequency 140.82. Later in the game, Campbell may give you tap codes for a new frequency to continue contacting him with. In case you need that as well it’s 140.24.
Use the Transceiver and dial it. After talking to Dr. Pettrovich Madnar, exit the cell with ID Card 2, and then head south all the way until you reach a swamp. Go back a screen and head north. Equip your Mine Detector and crawl all over the white dots that appear on your radar. These are mines, and you can pick them up while crawling over them. We will need these mines very soon. Go south and east again to the swamp.
Some crazy kid (one of many orphans scattered around Zanzibar Land giving funny advice) will tell you that a truck managed to get through the swamp. I’m not sure I believe him, but a person very well can… if he follows this map after going west, then east using the southern passage:
Use ID Card 2 to get into the arsenal building.
Arsenal
Use ID Card 1 to go through the northern door.
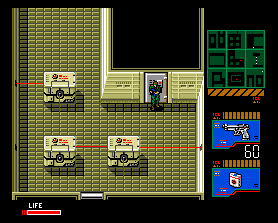
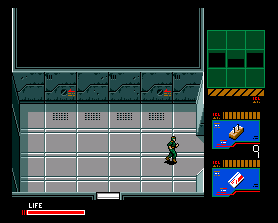
Boss: The Running Man
Why yes, he is a man who runs. How did you know?
First off, equip your Gas Mask. Remember to keep an eye on your oxygen (O2) meter. If it runs too low, go through the southern door with ID Card 1 and you’ll be back in the hallway of the arsenal building which doesn’t have nerve gas flowing in it.
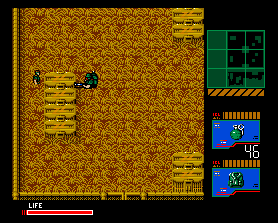
Equip your mines and analyze your radar. When you try to get close to the Running Man, he runs for it—you can’t see him during the fight because he’s too fast, though you can see him on your radar. There are certain places where the Running Man always runs over. Place your mines there. The best spot, shown in the screenshot here, he simply can’t avoid. So basically set mines there and some other hallways and run towards him so he runs over all of these mines you set. Just avoid running over your own mines like a pretty big idiot. Luckily the radar also displays your mines, even if you don’t equip the Mine Detector.
Arsenal
Wherever Running Man takes his last explosion (to be fair, how many can you take?), run up to him. Grab ID Card 3 which he drops after exploding for some reason. Now head out of this room where the boss battle took place and go back into the hallway of this building using ID Card 1 and exit the building using ID Card 2 (You can go to the eastern room if you want to talk to two rando orphans there, including one who hates men with guns aka you).
Jungle
Use the map above backwards. Then go west, south, west, and south back to the Zanzibar Building.
Zanzibar Building, 1F
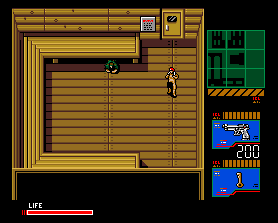
Note the stairway on the western side of the room. Go up them and enter the door with ID Card 3. Inside will be a camera of sorts. There isn’t a blind spot underneath these. There is that small vent-thing you can crawl into until the camera passes by and then crawl by. Watch out for guards here too. Head south twice and open the western door with ID Card 3. Inside are Stinger Missile Launchers. Take them and exit the room. There’s Handgun Ammunition across the room you can get by crawling, if you want. Otherwise, head back north three times using ID Card 3.
Get off the staircase, go east, and go through the southern door using ID Card 2. Head east and open the northern door here using ID Card 3 while taking out the guards in your way. In the room is the Red Card. The Red Card is basically ID Cards 1-3 combined (thus, you only have one card now). Exit the room, head west, open the northern door with the Red Card, head west, and go north.
Jungle
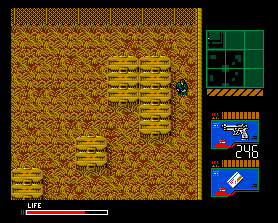
Go east, north, east, and north. Equip the Mine Detector and go north twice, crawling over mines you can’t avoid. Here, the sand squeaks because it’s fucked up (“singing sand” is a real thing but I doubt it sounds like that). My best advice is to squeak the south-western corner, run south, run all the way east and watch your radar if the soldiers are at the area where you squeaked, then crawl north under the trucks. Inside the back of one of the trucks is Handgun Ammunition while the other one has a B1 Ration, if you care. Then simply head all the way north.
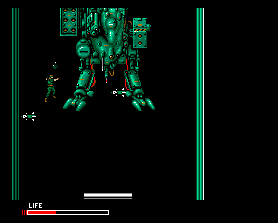
Boss: Hind D
It’s time to use those Stinger Missiles you got. You only have six, so you better do well here or face the pain backtracking all the way back to Zanzibar Building, 1F to stock up.
I recommend hiding in the vents to the east of where the Hind took off (shown in the screenshot here) and use the radar to study the pilot’s movements. If the Hind D gets in your screen and you’re NOT in the vent, quickly run to another screen. The bullets take a damn load of health and are hard to dodge.
The Stinger Missile Launcher works a bit odd here (it’s a 2D game, after all). If you select it, you can’t move (so if you ever need to, say, run for it, unequip the damn thing). Instead, a target is displayed over your radar (once again, shown in the screenshot). What you have to do is predict where the Hind D is gonna be and fire. Once you fire, it takes less than three seconds for it to hit its target, which hopefully is the Hind D. You have to hit it four times. It’s not as hard as you might think it is. Just don’t fuck up.
Jungle
After the Hind D explodes (which makes sense, unlike the other bosses blowing up after they’re defeated), head north twice from the helipad.
Outside Tower Building
This place infested with guards so be extra cautious. If you go to west and then through the vent, you can pick up a B1 Ration. Otherwise, head east. Enter the back of that truck to get everyone’s favorite disguise, the Cardboard Box. The conveyor belt here is a bit odd, isn’t it? Go next to it with the Cardboard Box equipped. Then use the Transceiver to answer a call, and volla, the belt starts moving and you’re in!
Tower Building, 1F
Head north. Yes, you can unequip the damn box. Answer your call, and then crawl in the vent in front of you to get a B2 Ration. Now head north, then west, and continue down the spiral until you reach a the second elevator. On your way, be careful of guards and noisy floors. You can use the vents to hide if a group of guards are about to get in the way. Take the elevator to B1.
Tower Building, B1
Head south, then west. Open both doors on the northern walls using the Red Card for some Ammunition and Plastic Explosives. After getting them, head west, then north. The room to the north is just empty with a little girl with some dumb advice, if you want. Otherwise, head east and open the door here with the Red Card. It’s a noisy-ass room. On the east, punch the walls until you hear a funny sounding wall. Place a Plastic Explosive here and it should make a pathway for you, as shown in the screenshot. Head east and you’ll have a short conversation with Holly White. She’ll give you ID Card 4. After she bails, head back out west and south using the Red Card. Head west, then south, then east twice, and finally back north into the elevator. Take it to the first floor.
Tower Building, 1F
On this screen, you can see an elevator on the other side. You have to get back around the spiral again. Which sucks, but whatever. Take that elevator to the tenth floor.
Tower Building, 10F
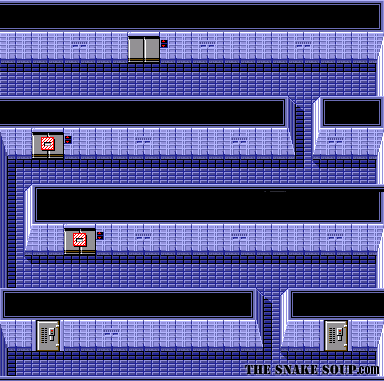
What a crummy floor. Those Zanzibar Land bastards decided to wall off the orphans by closing off the openings. The orphans don’t even give a shit, as they tell you how tasty grenades look. Whatever. Instead of mindlessly punching around like an idiot as these clueless kids stumble around, here’s a map of the openings:
While blowing up pathways, make sure you don’t kill any of the orphans. The orphans have the ability to cause their loss of life to affect your health. What kind of hippie bullshit is that? Anyways, there are two doors on the southern side of the room. The eastern door, which you can open with the Red Card, contains a B2 Ration, Ammunition, and Plastic Explosives. Go through the western one with ID Card 4 for some green pineapples, aka Grenades. Head all the way back north and take that elevator to the first floor.
Tower Building, 1F
If you didn’t already hate this floor, you will now. Continue west towards the end of the spiral. Go into the last damn elevator at the end of the spiral. If you need a Ration, go west from the screen with the last elevator and crawl into the tiny vent for a B3 Ration. Take the elevator to the 30th floor.
Boss: Red Blaster
Solid Snake is stunned to find himself “trapped” in-between some white lines. Red Blaster, who isn’t really red and not much of a blaster either, walks in like a spider on the ceiling or something.
Some people don’t have a problem fighting him in a small area. If so, go ahead and equip your Grenades and toss one at him once in a while while dodging his explosives. However, I recommend starting off the fight by simply running into the white lines (I have no idea what they are, silly strong? I don’t care) that restrict you. After a few bumps they go away and you get more room to run around in. Be careful of a few floor traps though.
Anyways, here’s all you need to do to kill him: run east. Wait. When he comes near, launch a Grenade at him. If it already hits him, or if he stops to throw an explosive at you, run west and do what you did before. Repeat. The only problem you might face is that the explosives can cause damage until the explosion animation is over (common sense, but it lasts for a second longer than they do in most games) and that you might be throwing your grenades too far or too close. Look at the screenshot. That’s where the target should be. Also keep in mind that your Grenades don’t have to directly hit Red Blaster. As long the explosion animation touches him, he’s fucked. Which is good.
Tower Building, 30F
The screen to the east of the elevator after Red Blaster explodes will open up. Be careful of the floor trap (shown above on the screenshot provided for Red Blaster) and go through it.
Tower Building, Stairway 30-Rooftop
Run all the way up to the rooftop. There will be a closed opening. Punch until you hear an odd noise, place a plastic explosive here, and blast a hole. Go through it.
Tower Building, Rooftop
Yosef Norden (aka Johan Jacobsen) is supposed to tell you that pigeons like meatballs, peas, and potatoes. What a coincidence! That’s exactly what B2 Rations have! Equip them and run up the pigeon (make sure it’s not flying. If it is, wait for it to land). You’ll find a message that makes no sense. So instead of pondering like a bitch, I’ll tell you what it means: WIS.OhIO = 140.41. Yeah. Anyways use the Transceiver to call that number and you get to talk to Kio Marv… who can’t speak English. Snake knows many languages, but Czech and Slovak aren’t any of them. Bummer. So call Dr. Pettrovich Madnar at 140.82.
Now what sucks is that we have to go all the way back to the Zanzibar Building. Wait, what? Didn’t Pettrovich Madnar say “THIS” building? Well, yes. It’s just that he doesn’t realize you’re in a different building he is. So you’ll have to go back. Bummer. Head through the opening in the south to get back to the stairway.
Tower Building, Stairway 30-Rooftop
Go all the way down to the 30th floor.
Tower Building, 30F
Remember that there is a trap here. Go east and use the elevator here to reach the first floor.
Tower Building, 1F
Well, fuck. You have to get out of this horrid place. Head east and in the small vent there you can pick up a B3 Ration again. Get out of the spiral. Use the vents to hide from the incoming guards. To the south of this entire building is an exit. Use ID Card 4 to get the fuck out.
Outside Tower Building
Punch out the guard in front of you and proceed south.
Jungle
Head south three times. Remember, the sand is noisy here and you can crawl across underneath the trucks. Continue south twice. Equip your Mine Detector and crawl over the mines in your way. Head south twice. Now head east twice, then south twice into the Zanzibar Building.
Zanzibar Building, 1F
Head east, then south using the Red Card. Head east twice, then south twice, and go west. Go up the stairway here and go east, then north, then west, and take the elevator to the third floor.
Zanzibar Building, 3F
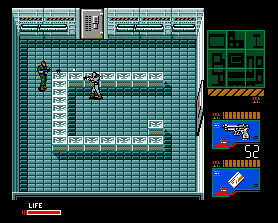
I dig this music. Anyways, go through the western door with ID Card 4. Open the door in the middle of this room with ID Card 4 for a B3 Ration. Exit, then head south. Be careful of the floor sensor and open the door here with the Red Card. Inside are some Remote Controlled Missiles. Snag them, then exit and head north twice. Open the northwestern door with the Red Card and head north in there twice for some Robotic Mice. These things are neat. Anyways, head south twice using the Red Card and open the northeastern door with ID Card 4. In here, open the door in front of you with the Red Card. Be absolutely sure the guard in there is walking away so you can go in and quickly go through the eastern door with the Red Card unnoticed. Also make sure you run quickly because the middle of the room is a trap. Go south here with the Red Card and get more Robotic Mice. Now exit this room, using the Red Card, by heading north, west, then south. Head south using ID Card 4, and you’re out.
Go east using ID Card 4, then go south using the Red Card. Head south, then open the bottom eastern door with the Red Card. Equip the Gas Mask and rush eastward. Keep an eye on the camera using your radar and head through the northern door with ID Card 4. Punch out the light switch to activate the lights and head north using ID Card 4. Either shoot down the three guards or punch them out quickly before any of them turn around. Go through the northern door using the Red Card. Run quickly to the west side of the room. When the guard here starts walking southward, run north, and snag the IR Goggles (or Night Vision Goggles) being mindful of the two traps here. Then wait for the guard to come back and walk north, in which you run back out with the Red Card. Head south twice using ID Card 4, then equip the Gas Mask and run south, then west, and open the door with the Red Card. Now open the top eastern door with the Red Card. Once again, wear your Gas Mask and run east, keep clear of the camera, then go north, open the northern door with ID Card 4, and grab the Gas Grenades. Exit with ID Card 4, equip the Gas Mask, run south, then west, and open the western door with the Red Card. Head north twice using the Red Card to get through the door, and take the elevator to the fourth floor.
Zanzibar Building, 4F
Go through the western door with ID Card 4. Be careful of that floor sensor because it goes off once in a while. I recommend waiting for it to go off and when it’s finished, run north. Make note of any guards, and continue north. There’s a camera here. Use the bush to help you avoid it, and continue west, then south twice (there’s an orphan girl in the door we’re skipping, but feel free to waste your time) and open the eastern door with the Red Card. Go through the southern door here using ID Card 4. Let there be light! Equip your IR Goggles. Crawl through the vent and be very fucking careful as the floor here is rigged with traps. Go through the southern door with the Red Card and…
HOLY SHIT! Oh. They’re all fake. Go through the eastern door with the Red Card. One of them is actually real here: the one not facing the direction the decoys are. Get rid of him and head north. There are always three guards here who are real, and there’s no way to really avoid these fuckers. You can have them rush towards you and disappear to the southern part of the screen, but sometimes they don’t leave and start firing. So take them all out and go through the eastern door with ID Card 4. Do not kill any guards in this room. Don’t even punch them out. Head east and open the eastern door with the Red Card for two B3 Rations. They’re probably frozen. Oh well. Exit, then head south, and then east.
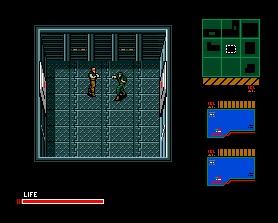
Enter the Men’s Bathroom and grab the Bucket. Exit the bathroom and hide behind the bush near the Women’s bathroom in the Bucket. A guard should arrive, look at the Women’s bathroom, and enter it. After that guard enters it, quickly enter it. Approach Natasha (aka Gustava). After a long conversation, go up to the elevator (yes, there’s a fucking elevator in the women’s bathroom) and take it to the third basement.
Zanzibar Building, Sewers (B3)
Go north. About those weird yellow things here… one touch and you’re done. So be careful. Watch your radar and stay against walls. Also keep in mind that you can’t crawl when you’re with Natasha. Too much on the ‘ol MSX2. So anyways, from here, head north twice, then west, then north. Go west. Take the elevator here to the first floor.
Jungle
Blah blah blah, talk talk talk, you get ID Card 5 and Dr. Pettrovich Madnar joins your unstoppable army of sorts like a god damned RPG. Take the elevator back to the sewers.
Zanzibar Building, Sewers (B3)
Head east twice. Open the northern door with ID Card 5. Rush north and eventually Dr. Pettrovich Madnar will have to piss or something. After a conversation, Dr. Pettrovich Madnar comes back. Continue north until you reach an elevator. Take it to the first floor.

Outside Detention Center
Equip your Mine Detector and head west three times. You will need to go north. Since you can’t crawl (to pick up the mines), use the radar to squeeze in-between the mines. Don’t worry about Natasha and the Doctor because they’ll follow your every move. So head north and a bunch of stuff happens (walk up when Natasha tells you to) after which you’re all alone again and the bridge you need to cross is broken. Fuck. At least you got ID Card 6 and the “official” Zanzibar Land Brooch! Um, yeah.
With the bridge broken, head south. Answer the call from Holly White and you can figure out how we can cross the bridge after the hint she gives. Anyways, equip your Mine Detector and crawl over the mines. You can enter the truck for more Mines, if you want. Head east. There are mines in front of the back of the trucks. So remember to crawl over them. The first truck has Remote Controlled Missiles and Gas Grenades. The second truck has three boxes of Ammunition. The third has Grenades. The last one has a Plastic Explosive and a B1 Ration. Exit the truck and head west again, and go through the southern door with ID Card 6.
Tower Building, 1F
Go south twice, then east. Go through the southern door using ID Card 4.
Outside Tower Building
Head south.
Jungle
I will just copy and paste what I said before: Head south three times. Remember, the sand is noisy here and you can crawl across underneath the trucks. Continue south twice. Equip your Mine Detector and crawl over the mines in your way. Head south twice. Now head east twice, then south twice into the Zanzibar Building.
Zanzibar Building, 1F
Go east and open the southern door with the Red Card. Go east. Go up the stairs and open the northern door with the Red Card. Open the western door with ID Card 6. Volla, you now have the Blue Card. This Card takes care of ID Cards 4-6. Exit using the Blue Card and go back south using the Red Card. Go west, then south twice. Go up the stairway and go east twice, then north, then west where you can take the elevator to the fourth floor.
Zanzibar Building, 4F
Go through the western door with the Blue Card. Avoid the sensor and go north, then east. Open the northern door with the Blue Card. This is the locker room. You can open the western lockers in both the top and bottom rows by running into them (though they have nothing inside, you can hide inside them). Head east. The floor is rather noisy. You do NOT want to wake up the sleeping guards here. So start crawling south. You can crawl under the beds, too, which is necessary when you get to the camera. You’ll have to crawl under a bed or two if you want to avoid the camera. When you reach all the way south, crawl to the eastern door. When you’re as close to it as possible, get up, and use the Red Card and get through. Now the lights are turned off. Equip your IR Goggles and go north. Open the northern door with the Blue Card and pick up the Pills. Exit the room with the Blue Card, quip the IR Goggles, and go south. Open the door here with the Red Card.
This is the sauna. Expect some (censored) 8-bit Zanzibar Land soldier nudity here. Quickly crawl under the bench-thing and equip the Zanzibar Land brooch. It will eventually heat up and become a key. After this happens and the naked soldier walks out, get out. As fast as you can, equip your IR Goggles, go through the western door with the Red Card, and start crawling north (while avoiding the camera again). Go west and open the top eastern locker with the Brooch which is now a Key. You will find a Cassette there. Take it, exit, and go through the southern door. Go west, south, then east using the Blue Card. Take the elevator to the second floor.
Zanzibar Building, 2F
Use the western elevator to go to B1.
Zanzibar Building, B1
Use the Red Card to get through the southern door. Open the western brown door with the Red Card and get Plastic Explosives. Exit and open the other brown door for ammunition. Exit and head east. Open the western brown door using the Blue Card for the Sub Machine Gun (it uses the same ammunition the Handgun does). Exit and open the eastern brown door here using the Blue Key for Grenades. Exit and go north. Open the brown door closest to you using the Red Card to get Remote Controlled Missiles. Exit and go through the northern brown door (be careful of a floor trap directly in front of it) to get Stinger Missiles and some Ammunition. Stock up, exit, and go north. Open the northern brown door with the Blue Card (and run to it, since there’s a trap in front of it) for a Bulletproof Vest (aka Body Armor). Exit and go south twice, then west. Open the western door (and avoid getting sucked up by yet another floor trap) with the Blue Card. Go west (break the white line thing by running into it for a while). Go through the western door with the Blue Card when the camera is heading above it towards the north, and grab the Grenades. Exit and equip the Cardboard Box or Bucket (the Bucket makes noise, so the Cardboard Box is recommended). Wait for the camera to pass by you towards the south and run north using the western passage. Open the door on this screen using the Blue Card for Robotic Mice and an O2 Tank. Exit, take the ammunition on the way north. Open the western door for some Gas Grenades. Exit and go south using the eastern passage by breaking the white line.
Here, go north using the eastern passage by breaking the other while line with the Cardboard Box or Bucket equipped if the camera is not near. If there is a camera, wait for it to go north before you follow it. With the Cardboard Box equipped, you can still break the white lines by running into them. It’s just that you should NOT move when the camera is on you. Otherwise you will trigger an alert. So break the three lines here while avoiding the camera watching you move, and open the door here with the Blue Card. In here is one of my favorite gadgets—the Camouflage Mat. It’s in your weapon menu. Select it, then “fire” at a place that would work (not in small areas or in front of doors) and then crawl under it. This is perfect for cameras. To pick it up again, you get up, or run over it if you didn’t crawl under it. Make sure nobody walks on top of you though. Anyways, exit and head south twice (avoid the cameras using your choice of Box, Bucket, Mat) and open the eastern door with the Blue Card. Avoid the trap and open the northern door with the Red Card. Take the elevator to the second floor.
Zanzibar Building, 2F
Take the eastern elevator to the first floor.
Zanzibar Building, 1F
Go east, then south, then west. Go down the stairway and go east, south, then east. Open the big-ass door here with the Blue Card. You can equip the Cassette and run north, go through the northern door with the Blue Card, grab the Hang Glider, then run back all the way south and exit with the Blue Card. Thing is, you can trigger an alert anyways when you open the northern door with the Blue Card (because the Cassette stops playing) so I say: fuck it. Just run, snag, and exit. What you can do if you’re too scared is equip the tape and punch out the real guards (they are blinking on the radar) then use the Blue Card to go through the door, take the Hang Glider, run south and exit. Your choice. After you exit, go west, north three times, then west twice and go through the northern door with the Red Card. Go west, then north.
Jungle
Go east, north, east, then north. Watch out for mines here and head north twice. Watch out for the noisy floor here and head north five times.
Outside Tower Building
Go through the northern door with the Blue Card.
Tower Building, 1F
Head north twice and take the elevator up. Before you do, equip the Sub Machine Gun and Bulletproof Vest because you’re about to face…
Boss: Ultra Box
No, not Ultravox the band (Or: No, not the Four Horsemen of the apocalypse). Just four crazy guys with guns who can jump really fucking high.
It’s hard to explain the strategy here. You gotta realize that the Ultra Box members, though experts in close-combat, prefer to get as far away from you as possible. Meaning you can run around like an idiot, or take two at a time first. Pick one corner (I for some reason prefer the southeastern corner, but it really doesn’t matter) and the opposite two members will jump down, run around, face you, and fire two bullets. Basically, try to fire bullets and time it right so that they will run into the incoming bullet. If they fire, dodge, but always get back to that corner. After one of them blows up, take down the next one (the opposite side of the dead guy will be available to run around in) and slowly kill them one by one. The hardest part is the beginning, but it eventually becomes really easy, especially when you only have one left to finish off.
Tower Building, 1F
ID Card 7 randomly drops in the middle of the elevator. Good for you. Take it. The elevator takes you back to the first floor. Thanks for nothing. Jerks. See the elevator that’s on the northern wall? Get in that one and take it to the tenth floor.
Tower Building, 10F
Remember this place? If you haven’t already, blow up the western wall with a Plastic Explosive and go through it. There are two sensors here that I don’t think you should give a shit because after you go through that southern door with ID Card 7, you will automatically trigger an alert. Equip your Handgun or Sub Machine Gun.
Tower Building, Staircase 10-20
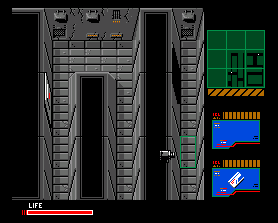
If you have played Metal Gear Solid then you probably can already tell it reused a lot of stuff from this game. Well, here’s another one.
Here’s what you gotta do: run all the way to the 20th floor. You probably will have to shoot any bastard in your way. I’d love to just end what I have to say for this part like that, but there’s some things I gotta warn you about. First off, remember those random white lines you run into to break? There’s two of those on your way up. You might have to run into it but then stop to turn around, shoot at a guard, and then finish breaking it. Also, there are two floor traps on the 17th floor right in the center. At least they give you three Ammunition Boxes on the way. At the end is the door to the 20th floor. Go through it using ID Card 7.
Tower Building, 20F
Ignore that camera. It’s inactive at the moment. Go east. Break the line here. Equip the Cardboard Box and go against the eastish wall here so the guard from the east won’t walk in and see you, or shoot you to see if anyone’s in the box. Eventually, the top guard will be looking towards the west so you can go east using the northern path. Break the line here and head north.
Tower Building, 20F, Balcony
Go west with the Cardboard Box equipped. Wait for the guard to head east and pick up the B2 Rations. Go to the edge of the balcony. Equip the Gas Grenades and the Gas Mask. Launch a Gas Grenade and when the arrow shows that the wind is headed north, equip the Cigarettes. Then after like two seconds, equip the Hang Glider and jump off.
Outside Detention Center
Head left twice, then open the northern door with ID Card 7.
Boss: Predator
Kojima watches too many movies (Or: Jungle Boogie by Kool & The Gang, except they say “Jungle Evil”).
Equip your Bulletproof Vest and Grenades. I actually use my Handgun and crawl around to confuse him, but some people die using this tactic. So use the one everyone else uses: go to the left of the crates and launch a Grenade at Predator when he pops up once in a while. Be sure to watch out just in case he shoots diagonally—his bullets somehow manage to go through the crates this way. You can also equip the Sub-Machine Gun and run alongside the southern fence and fire away.
Indoor Field
Predator explodes and leaves behind ID Card 8. Take it and use it to exit this building north.
Outside Zanzibar Bio Lab
Get into the building using ID Card 8 while avoiding the guard. Just run straight up.
Zanzibar Bio Lab
You got to go through the northern door with ID Card 8. To bypass the cameras, you can hide under the tables on your way north, though using the Cardboard Box is a lot easier. After you get through the door, go through the western door with the Blue Card. Equip your Cigarettes and get the Egg in the center of the lasers without tripping them. Then, go east through the northern pathway. Break the white lines and head east. Here, use the Cigarettes again to get the Egg here without tripping a laser, and go through the western door with ID Card 7. Go through the southern door with ID Card 8. Just exit the building south using ID Card 8 again (triggering an Alert here fills the room with gas, but you can escape easily with the guard outside not giving a flying fuck).
Outside Zanzibar Bio Lab
Go through the southern door with ID Card 8.
Indoor Field
Head south and go through the southern door with ID Card 7.
Outside Detention Center
Go east three times, keeping caution of the guards at the last screen. On this screen, take out the guards and enter the western truck, which has a lot of ammunition. The eastern truck has a B1 Ration, a Gas Grenade, and a Grenade. Exit the truck and go east twice while avoiding the floor sensors and not entering the trucks (or else!). Head north.
Detention Center
Take a look at your inventory. A snake is probably running loose eating your Rations. Dump that shit out by pressing the action button when it runs over the eggshell remains of the Egg it hatched out of. Equip the Egg that’s either intact or just about to hatch and wait for it to hatch. It will take a while. Head west here and enter the little shack here with ID Card 8. Talk to all three orphans, and don’t kill them you sick fuck. Wait for the egg to hatch and an Owl to appear. Get out of this room with ID Card 8. Go east and equip the Owl. Hide alongside the wall.
The Owl will eventually hoot, making the guard think it’s evening because he’s a simpleton and turn off the electric fence. Instead of immediately entering the complex, go east, and then north twice to pick up the B1 Ration there and go back south twice and west. Go through the now-opened entrance and… damn this place is rather complex. Two buildings have nothing but orphans in them. So let’s use this map to explain things. Of course, you should always keep an eye out for guards.
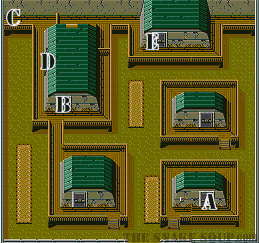
A: Open with the Red Card. Plastic Explosives, Grenades, and Ammunition are inside.
B: Open with ID Card 8. Go north using the western route. Exit using the Blue Card.
C: B1 Ration here. You need three of these later on, so be sure to stock up.
D: Head south and go north, this time using the eastern route while keeping clear of the sweeper. Use the little closet-space on the east side to help you get through. Go through the door here with the Red Card.
E: Enter with ID Card 8. Go in the elevator while avoiding the guards and take it to the Basement.
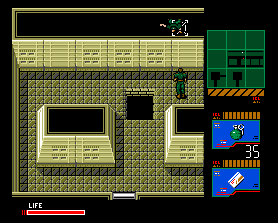
Boss: Night Sight
He’s the kind of guy who lets others introduce him.
After the call from your biggest fan ever, equip your Grenades and Bulletproof Vest. This is the boss I save my Grenades for. What I do is pin him to the center of the four crate-things here (as shown in the screenshot) using grenades from every angle. Keep in mind that when he shoots, you can see him. So launch a grenade at his direction. You can use a Sub Machine Gun, but Grenades make it oh so much easier.
Detention Center, B1
Go east and go through the northern door. Equip your B1 Rations and touch the puddles. You need three. If you don’t have three, get out and get them from “C” at the Detention Center map above. You don’t have ID Card 9 so you can’t go all the through quite yet. Exit, go west, and take the elevator to the first floor.
Detention Center
Go through the southern door with ID Card 8. Use the map above again to navigate your way around here. You are at “E.” Reach the entrance (you may have to equip the Owl and wait for it to hoot again so the guard will think it’s evening again and turn off the electric fence… again) and head south.
Outside Detention Center
Go west twice while avoiding the floor sensors. Eliminate the guards here and head west three times. Go through the northern gate with ID Card 7.
Indoor Field
Go north, then east. ID Card 9 is hidden where Snake is standing in the screenshot shown here. After taking it, go west, then south, and go through the doors with ID Card 7.
Outside Detention Center
Head east three times, get rid of the guards, go east twice more while keeping caution of the floor sensors, then north.
Detention Center
Refer to that map above again if your memory sucks. Use “B” to get to “E” and take the elevator to the Basement.
Detention Center, B1
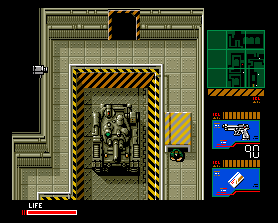
Go east, go through the northern door with ID Card 8. Go through the northern door here with ID Card 9. Dr. Pettrovich talks to you and then suddenly starts to hump you to death. Equip your Remote Control Missiles and fire away at the horny bastard. I actually had to use a Ration on this guy. What the fuck? Anyways, you can’t do shit just yet so let the creepy Doctor lie where he is. Time for another backtracking adventure! Go through the southern door using ID Card 9, then south and west. Take the elevator to the first floor.
Detention Center
Go through the southern door with ID Card 8. I know you hate this, but use the map above again to get to the entrance. Again, if the electric fence is back up just use the damn Owl. Go south.
Outside Detention Center
Head west twice while avoiding the floor sensors. Watch out for the two guards here (you might want to pick up things in these two trucks, though) and go west three times. Stand next to the conveyor belt and equip the Cardboard Box.
Tower Building, 1F
Go north twice, then west twice, then south twice, then east, and open the southern door with the Blue Card.
Outside Tower Building
Head south.
Jungle
Head south three times. Don’t forget, the sand is noisy and you can crawl across under the trucks. Continue south twice. Equip your Mine Detector and crawl over the mines in your way. Head south twice. Now head east twice, then south twice into the Zanzibar Building.
Zanzibar Building, 1F
Go east and open the southern door with the Red Card. Go east. Go up the stairs and open the northern door with the Red Card. Open the eastern door with ID Card 9. Take the Green Card, which takes care of ID Cards 7-9. Exit using the Green Card and go back south using the Red Card. Go east, then south three times, then west, then north. Climb the balcony and head east, north, then west. Take the elevator to the second floor.
Zanzibar Building, 4F
This will take a while. Go through the western door with the Blue Card. Watch out for the floor sensor and guard here, then go north twice. Head west while being mindful of the camera and then go south twice. Go through the eastern door with the Red Card. Go through the southern door with the Blue Card. Equip your IR Goggles and crawl through the opening. Be careful of floor traps and go through the southern door with the Red Card. Go through the eastern door with the Red Card, then north, Ignore the real guards and go through the eastern door here with the Blue Card. Go east, then through the eastern door with the Red Card.
Welcome to the freezer. Equip the Brooch and pick up Ration B2 and B3. They’re frozen, and whatever Rations you may be carrying will be too so if you need to use one, now’s the time. Your Brooch should turn into a Key. Get out of the freezer with the Red Card and go south, east, and go through the Women’s Bathroom (don’t worry, nobody will tell on you). Take the elevator to the third level basement.
Zanzibar Building, Sewers (B3)
Go north. Keep watch of those damn sweepers here again. Head north twice, then west, then north. Go east, and go through the northern door with the Blue Card. Then run all the way north until you reach an elevator, which you should take to the first floor.
Outside Detention Center
Go west four times and go through the southern door with the Blue Card.
Tower Building, 1F
Wait for the guards to pass by and go east twice. Go through the northern door here with the Green Card (trying to immigrate to Zanzibar Land?). Equip the Cardboard Box and get on the conveyor belt behind the truck.
Outside Detention Center
Head east while avoiding the floor sensors and go north.
Detention Center
Use the Owl because people have bad memory in this game. Use the Detention Center map above again to get to “E.” Stop complaining, this is the last time you’re going to use this map. Remember that doors that require ID Cards 7-9 can be opened with the Green Card, so use that to get in. Then take the elevator to the basement.
Detention Center, B1
Go east, then north. Go through the northern door with the Green Card. Equip the Key and go through the locker. What a big ass locker. Too bad there’s nothing inside. Or is there? Crawl through the hole. Gross, a fuckload of mice (the poisonous Zanzibar Land hamster, actually). Not only that, but they’ve got the touch of death. Bastards. Crawl back out to the actual locker and equip your B3 Rations and your Handgun. If they’re frozen you will have to wait. Eventually these creepy crawlies will smell the cheese in your B3 Rations and run out. They love cheese, you know. Kill all of those fuckers. Then, crawl through the hole and take the MSX Cartridge. Get out of the hole and out of the locker. Then… oh snaps!
Detention Center, B3
Go through the eastern door with the Red Card and pick up all of those Grenades. Exit and go through the southern door with the Red Card to pick up ammunition and a B2 Ration. Crawl into the vent and you get another B2 Ration. Exit, equip your Grenades and Bulletproof Vest, and go through the northern door with the Blue Card.
Boss: Metal Gear D
Remember when you had to destroy that Metal Gear in Outer Heaven and it didn’t move? Well… this one does.
D can only move north and south. Its only attacks are homing missiles and bullets. The missile are easily dodged by running towards the north side of the screen. The bullets aren’t so easy. Your Vest should help you take a few hits though. Now to take this beast down, you have to toss grenades at its legs. Whatever you do, DO NOT touch the legs because D will just stomp on you which is an instant death. If you run out of grenades because you’re a grenade-tossing lunatic, exit using the Blue Card and restock in the other rooms.
Detention Center, B3
You’re on fire. You can’t drop and roll. Get into your weapons inventory and drop whatever you have left in there using the action button. Next, go to the item inventory and drop everything. Save the Rations for last. You’re no longer on fire. Hooray. Run south, then west.
Boss: Gray Fox
Two grown men fighting over an MSX Cartridge. Sweet.
The entire perimeter of this room is rigged with mines. To make matters worse, Gray Fox, can walk on mines without blowing them up. This battle is actually pretty easy if you know what you’re doing. For one, Fox only does one attack: PUNCH-PUNCH-PUNCH. If you punch him, he gets away, then comes back to attack. What I like doing is punching him out of the way, going in the center of the room, and always making sure you face his direction and punch. Fox does some stupid shit like go in circles, so you can get a lot of hits in. If Fox gets too near and punches you, step back, punch, and step back into the center.
Detention Center, B3
After Gray Fox explodes, snag the MSX Cartridge and the western door suddenly opens. What are you waiting for? Go through it! Oh, the same person opens the northern door here. I wonder who we’ll find in here…
Boss: Big Boss
Yeah, he’s Big Boss.
Head east here. Take the B1 Ration and go back west. Open the northwestern door. Inside is ID Card 1. Exit and go west. Equip the B1 Ration and touch the acidy thing blocking the door. Ignore the door for now and head north. Take the B1 Ration here and go east. Open the southwestern door here using ID Card 1 and you will find ID Card 6 inside. Exit, and go east. Take the B1 Ration here, and then go through the southern door with ID Card 1. Inside is ID Card 2. Exit and head west twice. Open the southern door with ID Card 2. Crawl into the vent and you will pick up ID Card 3. Exit and go east twice, then south, then west. Open the northeastern door with ID Card 3. Inside is ID Card 4. Exit and go east. Go through the northern door with ID Card 4, and take the Lighter while keeping caution of the puddle. Exit, go north, then west, and go through the southeastern door with ID Card 4. Snatch ID Card 5 inside and exit. Go west, then south, and open the door here with ID Card 5. Inside is an Spray Can. Take it and leave.
Now the real battle begins. Equip the Lighter as your weapon and the Spray Can as your item. Fire! Don’t try this at home. My recommendation is to outsmart this guy by heading all the way north to the crates, and, as pictured, going behind them. See, the flame is able to go across the crates and harm Big Boss, while his bullets can’t reach you if shoots at your direction. He might try to walk behind the crates to kick your ass, but you can, again, go in front of the crates and fuck him up over there. Eventually, Big Boss will be in flames and die whining or something.
Detention Center, B3
After Big Boss is toast, head to the north, the middle area, and the northern door will open. Go through it. Run all the way north, shooting guards in your way (unlimited ammo rocks, huh?) and avoiding a floor trap that’s easily, well, avoidable. Call the elevator but turn around to keep firing. When the elevator arrives, take it to the first floor. You may have to shoot some guards that storm into the elevator as well.
Jungle
Pick up the B1 Ration, and follow the pathway, killing guards and running into white lines to break through them. You will eventually reach a helicopter pick-up site. Here, stand where Snake is standing in the picture here and just fire away until the helicopter takes you two to a comfy bedroom to have a very Merry Christmas.